Wednesday, December 8, 2010

Chicken Black Bean Chili


Well winter is certainly upon us and nothing warms the belly better than a big bowl of chili. I've been doing alot of cooking lately for a hungry work crew as we continue to build our house, so warm filling food is a must. This is sort of an on-the-fly recipe, made without measuring, but I find that those are usually the best meals, so I thought I'd share my process.

On-the-fly Chicken Black Bean Chili

Ingredients:
  • 1 large onion chopped
  • 3 small red peppers chopped
  • 4-5 cloves garlic chopped
  • 2 small chicken breasts cut into tiny pieces
  • 1 qt. canned black beans (I'll be posting how to home can your own soon!)
  • 1 can chick peas, rinsed
  • 1 qt. canned whole tomatoes
  • paprika
  • turmeric
  • ground cayenne pepper
  • fresh ground cumin
  • salt

Directions:
  1. Saute onion and red onions in a few tablespoons of olive oil for 5 minutes.
  2. Add chicken and garlic
  3. Add about 1/2tbsp turmeric and a few dashes of paprika
  4. Add about a tbsp ground cumin (the more the better in my opinion!)
  5. Add cayenne to your liking and salt to taste.
  6. When chicken is cooked through, transfer to a large soup pot.
  7. Add black beans, chick peas and tomatoes and let simmer.
  8. Serve with a dollop of homemade sour cream and top with shredded local cheddar.
Enjoy!

Friday, November 5, 2010

Weekend Workshop: Roasted Red Peppers


One of the most delectable of flavors is that of a roasted red pepper. Used in soups, on sandwiches or as part of an antipasto platter, there's nothing better than the freshly roasted variety. You might be surprised just how easy it is to do at home.

Hopefully you were able to save the last of the peppers from your garden off the plant before the frost, but if you missed out or don't have a garden of your own, they are still bountiful at the Farmers' Market. I grabbed a bunch from Cowdery Farms this morning.

How-to:
  1. Using your gas range (or grill) place red peppers a few at a time over the open flame, rotating often with tongs. You'll want to char all sides of the pepper until they become tender.
  2. Remove peppers from the stove and place in a covered bowl. The steam will help the skins come off easily.
  3. After all your peppers are done, start removing the charred skins. By this point, this process is easy. Avoid rinsing the pepper, instead, rinse your hands often and use your fingers to remove the black char.
  4. Cut open peppers and remove seeds and stems. Cut peppers into strips. At this point you can put them in a glass jar and cover with olive oil. This method will keep peppers fresh in the fridge for a few weeks. To preserve your peppers longer, you can place strips in a ziplock bag and freeze for later use.

Wednesday, November 3, 2010

Turnip Bacon Bake


Though, not usually high on the list of favorite vegetables, turnips are certainly one of mine. This root vegetable, actually part of the brassica family, is a great and tasty alternative to a potato as a side dish. Roasted, boiled, or mashed, choose turnips that are small and firm and seem heavy for their size.

After picking up some turnips from Proffitt's Farm at the Farmers Market this morning, I wanted to make something more exciting than my usual mashed turnips. After a quick recipe search I found the recipe below, Turnip Bacon Bake. I mean everything is great with bacon am I right? I baked this up and brought it down to a hungry work crew at the construction site of our new home. It was a big hit, although I think anything with bacon, butter and cheese will win these guys over. Enjoy!

Turnip Bacon Bake

Ingredients:
  • 6 tbsp butter
  • 6 pieces of bacon , chopped
  • 1 tbsp fresh thyme leaves
  • large onion , finely sliced
  • 1 quart basket of turnips , peeled and sliced
  • ½-1c mature cheddar , grated
Directions
  1. Heat oven to 325 degrees. Heat half the butter in an ovenproof frying pan on the stove. Add the bacon and cook for a few minutes, then add the thyme and onions, season and cook for a further 8-10 mins until the onions are soft and golden. Scoop the onions into a bowl, leaving the buttery juices in the pan.
  2. Turn off the heat and layer the sliced turnips in the pan with a scattering of fried onions, a sprinkling of cheese and some dots of butter between the layers. Season with a little salt and plenty of pepper as you go.
  3. Cover the pan with foil and bake for 1-1¼ hrs until the turnips are tender when prodded with the point of a knife. Leave the cake to relax for 5 minutes. Turn it upside down onto a plate or board, then cut into wedges and serve.

Wednesday, October 27, 2010

Cream of Broccoli Soup


This time of year, when it starts getting chilly, I look forward to warm soups served with bread. This morning at the farmers market I bought three beautiful heads of broccoli from Shade River Farms and thought instantly of my mom's cream of broccoli soup.

I made the recipe below using Snowville 2% milk, and added a little Laurel Valley Creamery's Cora shredded on top.

Cream of Broccoli Soup

Ingredients

  • 2 tablespoons butter
  • 1 onion, chopped
  • 1 stalk celery, chopped
  • 3 cups chicken broth
  • 8 cups broccoli florets
  • 3 tablespoons butter
  • 3 tablespoons all-purpose flour
  • 2 cups milk
  • ground black pepper to taste

Directions
  1. Melt 2 tablespoons butter in medium sized stock pot, and saute onion and celery until tender. Add broccoli and broth, cover and simmer for 10 minutes.
  2. Pour the soup into a blender or food processor, being careful not to fill more than halfway full. Hold down the lid of the blender with a folded kitchen towel, and carefully start the blender, using a few quick pulses to get the soup moving before leaving it on to puree. Puree in batches until smooth and pour into a clean pot. Alternately, you can use a stick blender and puree the soup right in the cooking pot.
  3. In small saucepan, over medium-heat melt 3 tablespoons butter, stir in flour and add milk. Stir until thick and bubbly, and add to soup. Season with pepper and serve.

Wednesday, October 13, 2010

Q is for Quince

Quince is fruit that, before today, I was quite unfamiliar with. I was so excited this morning to come across them at the Farmers Market from Cherry Orchards. It’s appearance resembles something like a cross between a pear and an apple, with a flavor quite similar, though more fragrant and beautiful. Though inedible raw due to high tannin levels and a hard texture, these lovely fruits turn a soft ruby color and develop a divine texture when cooked over time. Often made into jellies or pastes, quince is a popular fruit in Britain but is found quite often in traditional cookbooks.

The recipe below is adapted from the book The British Larder and serves 4. I made it this afternoon and I can attest that it is simply delicious. Best served with vanilla ice cream and good friends.

Quince and Almond Crumble

Topping (you will probably have some leftover, which you can keep in the freezer until next time)
• ¾ cup plain flour
• ½ cup almonds with skin
• 3 tbs brown sugar
• Pinch salt
• 4tbs unsalted butter, melted and cooled

Filling
• 1 cup sugar
• ¾ cup water
• 1 bay leaf
• 1 vanilla bean, seeds scraped
• 2 tablespoons lemon juice
• 2 quinces

  1. For the topping, place flour, almonds and brown sugar in a food processor and pulse until nuts are finely chopped. Add butter and pulse until just blended. Coarsely crumble in a shallow baking tray and chill for 1 hour.
  2. For the filling, place the sugar, water, vanilla seeds and bean, bay leaf and lemon juice into a saucepan and bring to the boil over very low heat. Let the syrup boil for 2 minutes and then start to prepare the quinces.
  3. Peel and core the quince, cut into snall cubes and place into the hot syrup. Half cover the saucepan with the lid, allowing the steam to escape. Slowly poach the quinces over low heat so that they retain their shape but cook at the same time. Once the quinces are tender, turn off the heat and set aside.
  4. Preheat the oven to 350°F and place 4 ramekins on a baking tray. Spoon the quince mixture evenly into the cups. Sprinkle with crumble topping. Bake for 15-20 minutes, rotate tray and bake for another 10 minutes or until topping is golden brown and filling is bubbling. Cool to warm or room temperature and serve with ice cream or custard.Garnish with a sugared vanilla bean if you'd like.

Wednesday, October 6, 2010

Apple Cider Doughnuts: Adventures in Doughnut Making

I've always heard friends reminiscing about delicious apple cider doughnuts they ate as a kid. I ate lots of good doughnuts when I was a kid. But never an apple cider doughnut. I had to know what all the hype was about. So today I set out to make my own.

I found what I thought looked to be a good recipe, but alas, I have never made doughnuts. Below is the recipe I used. The result was a denser cake doughnut, with little to no noticeable cider flavor. I share the recipe in hopes that someone, hopefully a master doughnut chef, will comment and give me some pointers. After barely being able to stomach a whole one, I jumped back online to research the subject and found that yeast risen doughnuts are the lighter fluffier variety I was striving for.

What this means, is now I am bound and determined to make a good apple cider doughnuts. In conclusion, stay tuned to a followup post. Adventures in Doughnut Making Round 2!!

Apple Cider Doughnuts: Proceed with Caution: Intense Doughnuts (Best if cut into doughnut holes)

Ingredients:
  • 1 cup apple cider
  • 3 1/2 cups flour, plus additional for the work surface
  • 2 teaspoons baking powder
  • 1 teaspoon baking soda
  • 1/2 teaspoon ground cinnamon (I used more cinnamon)
  • 1/2 teaspoon salt
  • 1/8 teaspoon ground nutmeg (I used about a dash)
  • 4 tablespoons butter, at room temperature
  • 1 cup granulated sugar
  • 2 eggs
  • 1/2 cup buttermilk
  • Vegetable oil for frying ( I used Canola)
Directions
  1. In a saucepan over medium or medium-low heat, gently reduce the apple cider to about 1/4 cup, 20 to 30 minutes. Set aside to cool.
  2. Meanwhile, in a bowl, combine the flour, baking powder and soda, cinnamon, salt and nutmeg. Set aside.
  3. Using an electric mixer on medium speed (with the paddle attachment, if using a standing mixer) beat the butter and granulated sugar until the mixture is smooth. Add the eggs, 1 at a time, and continue to beat until the eggs are completely incorporated. Use a spatula to scrape down the sides of the bowl occasionally. Reduce the speed to low and gradually add the reduced apple cider and the buttermilk, mixing just until combined. Add the flour mixture and continue to mix just until the dough comes together.
  4. Line 2 baking sheets with parchment or wax paper and sprinkle them generously with flour. Turn the dough onto 1 of the sheets and sprinkle the top with flour. Flatten the dough with your hands until it is about 1/2 inch thick. Use more flour if the dough is still wet. Transfer the dough to the freezer until it is slightly hardened, about 20 minutes. Pull the dough out of the freezer. Using a 3-inch doughnut cutter, cut out doughnut shapes. Place the cut doughnuts and doughnut holes onto the second sheet pan. Refrigerate the doughnuts for 20 to 30 minutes. (You may re-roll the scraps of dough, refrigerate them briefly and cut additional doughnuts from the dough.)
  5. Add enough oil to a deep-sided pan to measure a depth of about 3 inches. Attach a candy thermometer to the side of the pan and heat over medium heat until the oil reaches 350 degrees. Have ready a plate lined with several thicknesses of paper towels.
  6. To fry and assemble: Carefully add a few doughnuts to the oil, being careful not to crowd the pan, and fry until golden brown, about 60 seconds. Turn the doughnuts over and fry until the other side is golden, 30 to 60 seconds. Drain on paper towels after the doughnuts are fried. Roll the warm doughnuts into a cinnamon/sugar mixture and serve immediately.

Wednesday, September 29, 2010

So Ex(cider)ed


There is nothing that compares to freshly pressed apple cider. We are fortunate in our region to have numerous apple orchards that sell delicious fresh cider at the Farmers Market and now is the time of year when it is abundant.

Though widely available this time of year, it is a truly enjoyable experience to press your own cider. If you have the opportunity to try your hand at operating a cider press I highly recommend it. It's a great way to spend a fall day with your family or friends. If you don't have access to a cider press but still want to taste the sweet nectar of a freshly pressed apple, you can make your own cider with some simple household kitchen appliances.

To make your own cider you'll need:
  • Apples
  • Knife or apple corer
  • Blender or food processor
  • Cheese cloth
  • A large bowl
Instructions:
  1. Rinse apples and remove core and seeds. Cut into quarters
  2. Put apples into food processor or blender and puree. The more finely ground your apples are, the more juice you'll be able to extract.
  3. Place cheese cloth over a bowl and pour in a manageable amount of apple puree.
  4. Wrap up the puree and squeeze the apples to extract the juice into the bowl.
  5. Transfer your cider into a glass or plastic jar.
  6. Cider should be kept refrigerated and should last for up to seven days. You can pasteurize your cider by heating in a saucepan to 160 degrees F. Pasteurized cider will last up to three weeks in the fridge.
Apple cider will vary greatly in taste depending on the variety of apple you choose. Experiment with using different apples and mixing them together. Some apple varieties are sweeter, others produce a tangier cider. Check out the Farmers Market for a large selection of local varieties.

Tomorrow I'll share a few of my favorite apple cider recipes. What's your favorite way to enjoy cider?

Tuesday, September 28, 2010

Apple Season!

Apples are abundant at the Farmers Market. Apples by the bag, cider, or sauce, this week we'll share some great ways to enjoy apples this autumn season. Look forward to cider recipes, canning your own apple sauce, and some delicious sweet and savory recipes for apples.

Thursday, September 23, 2010

Leather Britches

I was watching the farm report the other morning, and heard a recipe that sounded simple and tasty, Leather Britches. Utilizing dried green beans and some bacon or salt pork, and water, you have a hearty, fall or winter soup. Making leather britches is a traditional southern method of preserving fresh garden green beans by stringing them to dry. Some versions call for blanching the beans first to preserve color and stop enzyme development. We suggest you trim and string the beans [prior to drying.

DIRECTIONS for DRYING
Pierce the beans or peas about one-third of the way from one end with a needle, then string them on clean heavy thread. Steam-blanch the beans or peas, string and all, for about 6 minutes, or until pliable and bright green in color. Blot dry with a clean dish towel.

Hang to dry in a warm, well-ventilated place. After drying, store them by hanging them under the eaves of the house, from the attic rafter, on a porch, or in your kitchen, if conditions permit.

PREPARATION TIP: If using green beans, do not dry in direct sunlight as they will lose all color. Vegetables need blanching before drying to set the color. Blanching hastens drying by softening the tissues, checking the ripening process, as well as destroying enzymes to prevent undesirable changes in texture, flavor, and color during drying or storage. Steam blanching is one of the best methods because blanching in boiling water adds more liquid to the food initially, thereby making the drying process longer. Steam-blanched vegetables will hold up to taste tests much better as well.

The Soup

Ingredients
  1. 1/2 lb. dried beans, cut in 1" diagonal strips
  2. 1/2 gal. water
  3. 1/4 lb. bacon pieces (4-5 slices), ham bone w/ some meat, or chopped salt pork
  4. (optional) 1 lb. potatoes
  5. salt and pepper to taste
Directions

  • Place beans in kettle and soak for at least 2 hours
  • Bring beans with water to low simmer and add meat
  • cook about 3 hrs (be careful that the water doesn't cook away, add more as necessary), until tender
  • add optional potatoes (if using) the last 30-45 minutes
  • adjust seasonings
  • serve with cornbread

Note; My mother always thickened hers with a slurry of water and flour, and served with cider vinegar at the table to add as desired.

Makes 8-12 servings

Wednesday, September 22, 2010

Wild Harvest: Chicken of the Woods


With all the uproar in Athens surrounding raising chickens in town, we can rest assured that no legislation will take away one of my favorite mushrooms, Chicken of the Woods. An unusually late rush of these bright orange polypores has made me a happy camper these last two weeks. Chicken of the Woods are one of the more easily identifiable edible mushrooms, though caution should always be taken when foraging for wild mushrooms. It has great flavor and a wonderful chicken like texture-- a great mushroom for those who think they hate mushrooms.

I spotted Chicken of the Woods at the Athens Farmers Market this morning at Integration Acres. Chris Chmiel and I noted that this years harvest was a little woodier in texture than usual but delicious none the less. If you go out in the woods, they typically grow on dead or mature oaks and other hardwoods.

My favorite recipe for this mushroom usually comes in the form of a Thai curry or soups but after finding a few pounds worth in the woods last weekend, my partner and I decided to make a quiche. Using almost entirely local and foraged ingredients, the result was a beautiful and delicious feast. Click the link below for the recipe and enjoy your own!

Wild Mushroom Quiche Recipe

Saturday, September 18, 2010

Way down yonder in the paw paw patch...


In honor of the 12th Annual Ohio Paw Paw Festival, I thought it was a proper occasion to post something about one of our most unique and delectable native fruits, the Paw Paw. Delicious on their own, ripe off the tree, there are several ways to enjoy this wonderful fruit.

Paw paw pulp can be frozen and stored for baking recipes and smoothies. Just scrape the fruit from the skin removing the skins and measure into quart sized freezer bags. Freeze bags flat for easy storage. The pulp makes a great substitute for bananas in recipes and is delicious in pancake or waffle batter.

One of my favorite ways to enjoy paw paws is in a lassi. A traditional Indian yogurt drink, a lassi is quite simple to make and a delightful treat. Blend 1 cup yogurt with 1 cup paw paw pulp and a few ice cubes until frothy and smooth. Drizzle with a little honey and sprinkle with cinnamon for garnish. I think the recipe tastes best with your own homemade yogurt. Learn how to make your own here!

For more ideas and to taste paw paws and recipes from around Ohio, be sure to visit the Paw Paw Festival this weekend

Tuesday, July 27, 2010

Zucchini Brownies

This is the time of year that we're overloaded with zucchini, and are running out of ways to use them. Last year we published a "Zucchini Mock Apple Pie" that was popular. Now, through our friend, Julia Farver, we have this recipe for "Zucchini Brownies".


Ingredients

* 1/2 cup vegetable oil (try substituting w/ coconut oil)
* 1 1/2 cups organic light brown sugar
* 2 teaspoons vanilla extract
* 2 cups all-purpose flour
* 1/2 cup unsweetened cocoa powder
* 1 1/2 teaspoons baking soda
* 1 teaspoon sea salt
* 2 cups shredded zucchini
* 1/2 cup chopped walnuts
*
* 6 tablespoons unsweetened cocoa powder
* 1/4 cup coconut oil
* 1 1/2 cups rice syrup
* 1/4 cup milk
* 1/2 teaspoon vanilla extract


Directions

1. Preheat oven to 350 degrees F (175 degrees C). Grease and flour a 9x13 inch baking pan.
2. In a large bowl, mix together the oil, sugar and 2 teaspoons vanilla until well blended. Combine the flour, 1/2 cup cocoa, baking soda and sea salt; stir into the sugar mixture. Fold in the zucchini and walnuts. Spread evenly into the prepared pan.
3. Bake for 25 to 30 minutes in the preheated oven, until brownies spring back when gently touched. To make the frosting, melt together the 6 tablespoons of cocoa and coconut oil; set aside to cool. In a medium bowl, blend together the rice syrup (warmed to soften), milk and 1/2 teaspoon vanilla. Stir in the cocoa mixture. Spread over cooled brownies before cutting into squares.

Yield
24 servings

Tuesday, June 29, 2010

This Week at Chesterhill


Summer is officially upon us. I recently visited the Chesterhill Produce Auction and was delighted at the variety of fresh produce available. Sweet corn, cabbage, broccoli and bell peppers are rolling in. We're catching the end of the strawberries, but are met happily with blueberries and raspberries. We saw early apples and the most delicious red plums I've tasted. I treated myself to some tasty homemade cookies from the CPA Country Store and chatted with friends.

If you haven't made it out to the auction yet this year, what are you waiting for? Whether your cooking for a party, feeding your family or are looking for large quantities of produce to can and preserve for the winter months, there's plenty to choose from. This is truly an enjoyable community event. Bring your kids, bring your friends and head out to the country.

Auctions are held every Monday and Thursday at 4:00pm. Check out current auction prices by visiting www.ohiofoodshed.org/chesterhill

Tuesday, June 22, 2010

Grilling vegetables

Ahh, summer is here, the Fourth of July around the corner, grilling season has arrived! There are many methods for grilling vegetables, from shish kebobs to simply laying the vegetables right on the grill. Most people marinate their vegetables before grilling. You can use any marinade you like, including French, Italian or ranch salad dressing, sweet and sour, barbeque or teriyaki sauce. Here's a simple marinade I especially enjoy with zucchini and eggplant, served with fresh tomato wedges on the side.

The Marinade


1 cup extra virgin olive oil
1/2 cup Balsamic vinegar
1 large clove of garlic, finely minced
1 tsp. dried oregano leaves
1 tsp. freshly ground black pepper

Directions


1) Start the grill
2) Slice the vegetables on a diagonal, about 1/4-1/2 inch thick
3) Marinate for at least 1 hour
4) Place vegetables on the grill and roast 3-5 minutes per side
5) Enjoy

Monday, June 21, 2010

Fried Green Tomatoes

Every spring, I long for the arrival of deliciously ripe heirloom tomatoes, sliced fresh and sprinkled with a dash of salt and pepper. And even though we live in an area where some farmers grow greenhouse tomatoes, and we can enjoys their fruits sooner, I can prolong the satisfaction by enjoying the tart taste of a green tomato.

Green tomatoes have a great firm texture and satisfy both tart and sweet tastebuds. They are a fabulous addition to stir-fries and chutneys, but my favorite way to enjoy them will always be fried green tomatoes.

While deep frying certainly isn't the healthiest way to enjoy the season's bountiful harvest, I make an exception when it comes the this delicious treat. My recipe for the tomatoes tends to stay the same, but I enjoy trying out new sauces to dip them in. But when, I'm just looking for a fast tasty snack, these are just perfect on their own:

Fried Green Tomatoes

Ingredients
  • 3 green tomatoes, sliced
  • 2 eggs
  • 3 tbs whole wheat flour or fine cornmeal
  • 1/2 tsp thyme
  • a pinch of oregano
  • a pinch of curry powder
  • dash of salt and pepper
  • oil for frying (I usually use canola)
  • chopped fresh parsley for garnish
Directions
  1. Beat eggs in a small bowl
  2. Combine flour or cornmeal with herbs and spices
  3. Add about an inch of oil to a cast iron pan or heavy skillet. Heat over medium-high heat until hot
  4. Dip sliced tomatoes in egg mixture
  5. Place slice in breading mix making sure to coat both sides of tomatoes evenly
  6. Place coated slices into fryer oil, fry until golden brown on both sides
  7. Remove from oil with slotted spoon or fork and place on paper towel or newspaper
  8. Garnish and enjoy!

Tuesday, June 8, 2010

Strawberry: The Flavor of Summer!

Everywhere you look from the Farmers' Market to the Chesterhill Produce Auction, to your own backyard patch, strawberries are abundant! There nothing like eating a ripe red berry freshly picked!

Strawberries are rich in antioxidants, fiber, folate, and potassium. They also pack more vitamin C ounce for ounce than most citrus fruit. Eating vitamin C-rich foods promotes healthy brain functioning and boosts your immune system.

Enjoy strawberries fresh from the patch, atop shortcake with hand whipped cream, sliced fresh on salads with a balsamic vinagrette or store the flavor all year long in a delicious jam!

Strawberries can be easily frozen to save for smoothies in the winter months. Simply rinse, hull and halve berries, spread on a cookie sheet and freeze. Transfer frozen berries to a freezer safe ziplock baggie.

Check out local nurseries and greenhouses to find out more about growing your own! Strawberries require full sun and well-drained, sandy soil. They will not tolerate drought or standing water. Plant them in the spring as soon as the soil is dry enough to work.

Not a green-thumb? Don't worry! Strawberries are plentiful this time of year. Head over to your local farmers' market, visit the Chesterhill Produce Auction, or visit a pick-your-own farm to endulge in all the berry-picking fun!

Strawberry Jam
recipe makes 48 ounces

Ingredients
  • 4 pounds strawberries, rinsed, hulled, and cut into 1-inch pieces
  • 5 cups granulated sugar (2 1/4 pounds)
Directions

  1. Put a small plate in the freezer. Place berries in a nonreactive 10-quart stockpot set over medium-high heat. Using a wooden spoon, mix in 1/4 cup sugar with berries. Cook, stirring, until berries are juicy, 5 to 6 minutes. Stir in a third of remaining sugar until dissolved. Repeat until all the sugar has been added and dissolved, about 7 minutes total.
  2. Bring mixture to a full boil; cook, stirring, 10 minutes. Continue boiling; use a stainless-steel spoon to remove foam from surface. Boil until most of the liquid is absorbed, mixture thickens, and temperature registers 220 degrees.on a candy thermometer, about 30 minutes.
  3. Perform a gel test: Place a spoonful of jam on chilled plate, and return to freezer. Wait 1 to 2 minutes; remove plate from freezer, and gently press jam with fingertip; it should wrinkle slightly.
  4. After jam passes the gel test, remove from heat. Pour warm jam into jars and can to seal.

Tuesday, May 18, 2010

Chesterhill Produce Auction

So, why a bit on the Chesterhill Produce Auction in "eat with the season"? Because the CPA is an opportunity to get fresh, seasonal produce, and meet the growers. The following is from our (Rural Action) press release for this year's opening auction. We hope to see you there!


Chesterhill Produce Auction Opening Day

Rural Action Sustainable Agriculture Announces the 2010 opening day celebration of the Chesterhill Produce Auction, Thursday May 20, 2010, festivities begin at 3:00pm, the Auction starts at 4:00pm.

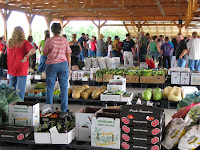
A produce auction is a form of agricultural market where produce is sold at auction in a variety of quantities, to a variety of buyers. Buyers and sellers are issued numbers, a clerk records the transactions, customers pay at the end of the auction, and growers are given weekly checks for what they sell. Produce is brought in by the farmers and laid out on pallets for customers to inspect.

Produce Auctions offer a unique view of the production capabilities of some of our agricultural communities. Chesterhill has now become a destination in South Eastern Ohio for local produce and other farm and craft products. Since its inception in June of 2005, thousands of people from throughout Ohio and West Virginia have come to the Produce Auction for the quality of goods and the camaraderie. The Chesterhill Produce Auction is now owned and operated by Rural Action through community support.

Buyers at the auction include restaurants, grocery stores, road side stands, individuals looking to preserve food and share with neighbors, and since 2007 Ohio University Dining Services. Whether your needs are personal or business related, this is an opportunity to support your friends and neighbors, and get the next freshest thing to harvesting your own. The action is fast paced and exciting, and offers a sense of community as well as an opportunity to purchase high quality farm products. Starting May 20th the Auction will run every Thursday through mid-October, Monday auctions will start on June 7th.

The Auction is located at 8380 Wagoner Road, 43728 , between Route 555 and Route 377, southwest of Chesterhill, Ohio in Morgan County. Auction prices and products are posted weekly on www.ohiofoodshed.org.


For further information contact:

Tom Redfern by phone at 740-767-4938 or by e-mail at tomr@ruralaction.org

Or Bob Fedyski at 740-767-4938 or email bob@ruralaction.org.

Rural Action is a local membership-based nonprofit organization promoting social, economic and environmental justice and working for sustainable communities, economies and environments in Appalachian Ohio.

Tuesday, May 4, 2010

Stewed Rhubarb


One of the things I loved about spring as a kid was Stewed Rhubarb, and I still do. Served piping hot over fresh churned vanilla ice cream is a real delight! You can even add strawberries or blueberries, and take even further by adding a crisp topping like granola, sprinkled over it. Here's a very simple recipe for stewed rhubarb, which makes me wonder why more people don't make it. Enjoy!


Ingredients

  • 1 lb. rhubarb
  • 1/2 cup organic light brown sugar, or your choice of sweetener (molasses or honey make for unique flavor, rice syrup also works well)
  • 1 tsp. ginger
  • 1 tsp. cinnamon
  • 1 Tbl. water
Directions
  1. Wash and cut rhubarb into 1-1 1/2 inch pieces.
  2. Put in pot with water.
  3. Add sweetener, ginger, and cinnamon.
  4. Cover and cook over medium heat 'til tender and stewed.
  5. Serve as desired. I like it over fresh-churned ice cream, with yogurt, and/or with granola sprinkled over it.
  6. Eat and enjoy!

Sunday, April 11, 2010

Stinging Nettle Soup

Courtney Denning posted this link, http://www.flickr.com/photos/crooked_ed/138250251/in/set-72057594074700421/ , for a tasty Nettle Soup. A lot of people are aware of how nutritious and tasty they can be. Stinging nettle has been used for hundreds of years to treat rheumatism (disorders of the muscles and joints), eczema, arthritis, gout, and anemia.

Ingredients:
  • 40g (about 1/2 lb.) young nettle heads (stalks removed)
  • 1 large leek
  • 2 cloves of garlic
  • 1 stick of celery
  • 2 potatoes
  • 750ml ( about 1&1/2 pints) of organic vegetable stock
  • 1 Tbl. Olive oil
  • sea salt and cracked black pepper (to taste)
  • Serve with sour cream and buttered croutons
Directions:
  1. In a large pot, put in olive oil over medium-high heat. Add onion. Cook, stirring occasionally, until onions are soft, about 3 minutes.
  2. Add potatoes and stock and bring to a boil. Reduce heat to maintain a low, steady simmer and cook 15 minutes.
  3. Add nettles and cook until very tender, about 10 minutes. Adjust seasoning.
  4. Puree soup with an immersion blender or in a blender or food processer in batches. For a silken, less fibrous texture, run mixture through a food mill or sieve.
  5. Stir in cream, if using. Season to taste with additional salt and pepper, if you like.
  6. Serve hot, garnished with sour cream or yogurt, and croutons.
Servings: 4-6

Tuesday, April 6, 2010

Ramps and Pasta


This time of year we're hearing a lot about West Virginia ramp festivals, and people are asking "What are ramps?" and "How do you use them?" Well, you can use ramps in any recipe that calls for garlic or scallions. The whole plant is edible. I like them in potato salad, with fried potatoes, and this way, with pasta.


Ingredients

  • 1/2 lb ramps
  • 1 teaspoon finely grated fresh lemon zest or lemon juice
  • Crushed red pepper (optional)
  • 1/4 cup extra-virgin olive oil
  • 1 lb pasta of choice (I like farfella [bowtie] pasta)
  • 4 tablespoons freshly grated Parmesan
Directions
  1. Trim roots from ramps and slip off outer skin on bulbs, if loose. Blanch ramps in a 6-quart pot of boiling salted water, 5 to 10 seconds, lift out of boiling water and transfer to cutting board. Coarsely chop ramps and put in a blender with zest and oil.
  2. Add pasta to boiling water and cook a few minutes, then ladle out 1/2 cup pasta water and add to blender. Purée ramps until smooth and season with salt. Continue to cook pasta until al dente, then ladle out about 1 cup additional pasta water before draining spaghetti in a colander. Return pasta to pot with ramp purée and toss with parmesan over moderate heat for several minutes, thinning sauce with a little pasta water as needed to coat pasta.
  3. Transfer to serving plate.

Friday, April 2, 2010

Weekend Workshop: More on Yogurt Making


Last night, I taught a yogurt making workshop in collaboration with Community Food Initiatives at AceNet as part of OU's Earth Month. The original posting for instructions on making yogurt at home can be found here.

A copy of the PDF handout from last nights workshop can be found here. It includes illustrated instructions on making yogurt, as well as a list of the health benefits, and some tips and recipes for making flavored yogurts, fruit-on-the-bottom yogurts and making Greek yogurt.

We had a great turnout for the workshop. Folks asked some great questions, and everyone was able to take home a cup of yogurt to start their own batch.

For those who asked about adding powdered milk to the recipe to thicken the yogurt, add 1/3 cup to your 1 qt. milk recipe.

A few members of the group asked about making non-dairy yogurts, such as soy and coconut milk yogurts. I have not had experience with this, but I promised to look into it. Below are a few links to some helpful tutorials. I have not tested these recipes, but they sound promising. I would love to hear from folks, if anyone tries these recipes out-- tell us about your experiences!

Tuesday, March 23, 2010

Maple Syrup


The sugaring season has quickly come and gone, but for those who put in the hard work, it was short and sweet.

Whether you're doing your own small scale operation on your property or supporting local syrup producers, here are a few ways to enjoy one of the sweetest thing nature has to offer.

Maple Baked Apples

Prep Time: 5 minutes
Cooking Time: 30 minutes
Serves: 6

Ingredients:
  • 6 large tart apples, stemmed, cored and hollowed out
  • 6 tablespoons raisins
  • 6 tablespoons chopped walnuts
  • 1 1/2teaspoons ground cinnamon
  • 1/2 cup maple syrup
  • 1 cup water
  • 1/3 cup vanilla yogurt, optional
Directions:

1. Preheat oven to 350°F. Place apples upright in oven-proof baking dish. In a small bowl, mix raisins, walnuts and cinnamon together. Fill each apple with 2 tablespoons of the raisin mixture.

2. Mix maple syrup with water and pour over the apples. Bake 30 minutes or until apples are tender. Occasionally baste with maple syrup sauce. Serve warm with a dollop of vanilla yogurt if desired.

Maple-Roasted Chicken with Sweet Potatoes

Prep Time: 15 minutes
Cooking Time: 1-½ hours
Serves 4

Ingredients

  • 1 3 1/2- to 4-pound chicken, cut into 8 pieces
  • 1 yellow onion, cut into 1-inch wedges
  • 2 small sweet potatoes, peeled and cut into 1-inch chunks
  • 2 tablespoons olive oil
  • 1 teaspoon kosher salt
  • 1/4 teaspoon black pepper
  • 3 tablespoons maple syrup
  • 6 sprigs fresh thyme

Directions

  1. Heat oven to 400° F.
  2. Rinse the chicken and pat it dry. Arrange the chicken, onion, and sweet potatoes in a 9-by-13-inch baking dish. Drizzle the oil over the chicken and vegetables and season with the salt and pepper. Toss to coat. Drizzle with the maple syrup and top with the sprigs of thyme.
  3. Roast, stirring the vegetables once, until the chicken is cooked through, about 1 hour, 15 minutes. Let rest for 10 minutes before serving.

Sunday, February 28, 2010

Chicken and Corn Chowder

I bet a lot of you are craving a hearty chowder about now. Did you happen to freeze any corn this summer? Well, then you're in luck. I hope you enjoy this.


Ingredients: (Poached chicken and chicken broth)

  • 1 large (5-6 pounds) chicken
  • 1 large onion, chopped
  • 1 stalk celery, chopped
  • 1 carrot,chopped
  • 2 cloves garlic, minced
  • 1 tsp. thyme
  • 1 teaspoon black peppercorns, fresh ground or crushed
  • 1Tbl. sea salt

Directions:

  1. Combine the chicken, onion, celery, carrot, garlic, thyme, pepper and salt in a large pot.
  2. Add water to cover, at least 3 quarts.
  3. Bring the water to a simmer.
  4. Skim, add more water if necessary to keep the chicken covered, and continue to gently simmer until the chicken is fully cooked (the juices from the thigh will run clear), about 40 minutes.
  5. Drain the chicken reserving the broth.
  6. Allow the chicken to cool then remove the meat from the bones. Discard the bones and refrigerate the meat until ready to make the chowder.
  7. Measure out 1 1/2 quarts of the broth and reserve for the chowder.
  8. Freeze or refrigerate any remaining broth until needed for another purpose.

The chowder

Ingredients:

  • 1/2 pound thick bacon, diced
  • 1 tablespoon extra-virgin olive oil
  • 5 stalks celery, diced
  • 2 medium Spanish onions, diced
  • 4 medium red potatoes, diced
  • 3 cups fresh, or frozen corn, removed from the cob
  • 1 to 2 teaspoons fresh, or dry, thyme leaves
  • 1 dried cayenne pepper
  • Chicken, chopped to 1/2 " pieces
  • 1&1/2 qt. chicken broth
  • 3 cups heavy cream
  • Freshly ground black pepper

Directions:

  1. Heat the bacon and olive oil in a large pot over medium heat.
  2. Cook until the bacon fat is rendered and the meat firming but not yet crisp, about 5 minutes.
  3. Add the celery and onions.
  4. Reduce the heat to medium-low and cook, stirring occasionally until the vegetables begin to soften, about 6 minutes.
  5. Add the potatoes, and thyme. Continue to cook, stirring occasionally, until the onions are fully soft, about 8 additional minutes.
  6. Add the chicken broth to the pot and bring the broth to a simmer over medium-high heat.
  7. Turn down the heat and simmer, low, until potatoes are tender, about 10 minutes.
  8. Add the cream, corn, and reserved chicken.
  9. Return the chowder to a simmer, then immediately reduce to lowest possible heat.
  10. Season to taste with salt and pepper.
  11. Ladle into warm bowls and serve.

Several garnishes are appropriate:

    • Strips of roasted red pepper
    • Chopped, fresh parsley
    • Crumbled bacon
    • Minced, fresh dill
    • Green onion (green part only), sliced very thin on diagonal
Yield:
16 servings

Navy Bean Soup

As many are sitting around their wood stoves right now, I hope they are allowing it to do double duty. Along with your tea water, it's a great slow-cooker with the addition of a trivet, or using a cast iron dutch oven with legs. This is just one, of many, variations of navy bean soup. Use your own favorite. I like to make a large batch, and freeze leftovers for another day.

Ingredients

  1. 1 & 1/2 pounds dried navy beans (about 3 cups)
  2. 3 quarts water
  3. 1+ cup chopped onion
  4. 2 garlic cloves, chopped
  5. 2 smoked ham hocks (about 1 lb.)
  6. 1 tsp. dried thyme
  7. 1 dried cayenne pepper
  8. 1 large bay leaf
  9. 2 large diced carrots
  10. Sea salt and fresh ground black pepper, to taste

Directions

  • Carefully pick through and wash beans then place in a container. Cover with water to 2 inches above beans and let stand 8 hours. Drain beans.

  • Combine the beans, 3 qts. water, and next 6 ingredients (water through bay leaf) in thick walled pot (ideally, porcelain coated, cast iron dutch oven), and place on wood stove. (If the pot/dutch oven doesn't have legs, place on trivet.
  • Stir occasionally (especially until you are familiar with cooking on your wood stove), add more water as needed.
  • After 3-4 hours, stir in the carrot and pepper. Cook about another 1&1/2-2 hours, until the beans are completely tender.
  • Remove bay leaves, and discard. Remove the ham hocks, and shred meat, discarding fat and gristle. Return the meat to pan.
  • Stir, taste, and adjust seasonings.
  • Serve
Serving options

Serve with fresh chopped onions and/or fresh corn bread.

Yield

12-16 servings

Thursday, February 25, 2010

Chicken Vegetable Soup

I'm sure I'm not the only one craving a hearty chicken vegetable soup right now. Watching the snow fall outside my window makes it even more appealing. This recipe is [almost] the one my mother shared with us.

Ingredients
  1. 1 (3-4 pound) whole chicken
  2. 6 med.-large carrots, cut in 1" pieces
  3. 6 stalks celery,cut into 1" pieces
  4. 2 medium onions, chopped into 1/4-1/2" pieces
  5. 1 gal. cold, filtered water
  6. 1 dried cayenne pepper
  7. 1 med. - large clove garlic, crushed
  8. 1/4 cup fresh parsley, chopped fine
  9. 1/4 lb. fresh spinach, shredded (sliced into 1/4" slices)*
  10. sea salt and fresh ground pepper to taste

Directions

  • Put the chicken, with the cayenne, garlic, half the carrots, 1/2 the celery and 1/2 the onion, in a large soup pot and cover with cold water.
  • Bring to a boil, then immediately reduce to a low simmer, uncovered, until the chicken meat begins to fall off of the bone (skim off foam every so often).
  • Take everything out of the pot. Strain the broth. Season the broth with salt, and pepper to taste.
  • Bone the chicken and chop into bite size pieces.
  • Return the chicken meat, with all the carrots, celery, and onion to the pot, stir together, and simmer an additional 15 minutes ('til the newly added vegetables are al dente).
  • Add parsley and stir through.
  • Place about 2 Tbl. of shredded spinach in the bottom of soup bowl, and ladle 1 steaming serving of soup over it.
Yield

About 10 servings.

*
To "shred" the spinach, roll the leaves together like a cigar, and slice in approximately 1/4" slices.

Monday, February 8, 2010

Garlicky Kale with New Potatoes

This time of the year there's not too much available at the Farmers' Markets, but I still see greens, garlic, and potatoes, so I thought of this recipe. Hope you enjoy.

Ingredients

  1. 1 large bunch of kale or collard greens
  2. 24 small new potatoes (2 lbs.) scrubbed
  3. 1 T olive oil
  4. 1 small onion
  5. 3-4 cloves garlic, crushed
  6. 1/4 to 1/2 C water
  7. Juice of 1/2 lemon to 1 lemon, to taste
  8. Salt and pepper to taste
Directions
  • Remove stems and thick midribs from greens. Discard stems; midribs may be finely diced and used if desired. Rinse greens several times to make sure that all sand and grit are removed.
  • Steam potatoes in skins until tender. When cool enough to handle, cut in half.
  • Meanwhile, in large pot or stir-fry pan, heat oil over medium heat.
  • Add onion and garlic and cook, stirring frequently, for 2-3 minutes.
  • Add greens, cover and steam until just tender, adding 1/4 to 1/2 C water as needed (steaming time varies greatly, so check frequently, but a good estimate is 10-15 minutes).
  • Drain and transfer to colander. Remove and discard garlic.
  • When cool enough to handle, squeeze out excess liquid.
  • In a serving bowl, combine chopped greens, potatoes and lemon juice; toss to mix.
  • Season to taste with salt and pepper and serve.
Yield

Makes 6 servings.